Here's a look at Tuesday Through my Window.

Your wish is granted. So many of you asked how I made these lanterns that I thought I would leave you a tutorial.
Supplies:
- 18 x 12 manila drawing paper
- Tissue paper in a variety of colors
- Double stick tape
- Scotch tape
- Glue Dots
- Scissors
- Poster board
- Pencil
- Variety of color crayons

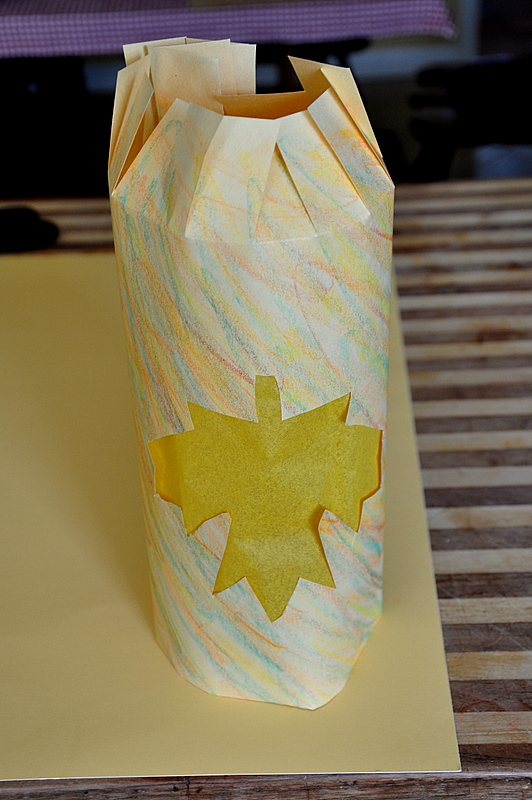
Take your manila paper and scribble all over it using one crayon at a time. We oftentimes would use 6 to 8 colors on each sheet.

Fold up the bottom 1 1/2 to 2 inches.

On the bottom fold that you just made, cut one inch slits aloong the bottom and up to the fold line. Once that is completed fold both sides of the paper.


And fold down the top. Using a maple leaf pattern, trace this onto the back side ( non colored) side of the lantern.


Next, cut out the maple leaf pattern, being careful not to rip the lantern itself.

Taking one sheet of tissue paper,cut out a square which will cover the leaf. Go ahead and tape this onto the leaf cut-out with tape. You will want to tape all four corners and the top and the bottom. This will hold it into place when we bring the sides together to make a cyclinder.

Now hold the piece of paper up with the tissue paper facing you. Bring the sides together by hooking the tops into one another and taping it into place. Once in place, use your double sided tape and put it under the lip of the top part of the which is overlapping. I use a couple long pieces of tape to make a really nice seam which sticks together. Now adjust the lantern so it is truly a cyclinder.

Using the top part of the lantern, place it on the poster board, trace a circle and cut it out. This is the bottom to the lantern.


Turn your lantern upside down so that the fringe is on top and facing you. Adjust the fringe so that it becomes the bottom of your lantern and the fringe folds down nicely. Place double stick tape on the bottom of your lantern.


Taking the bottom posterboard piece of your lantern bottom, place glue dots all around the perimeter but not too close to the edge. Place this piece on top of the double stick tape and fix it to the lantern. Trim the bottom piece if necessary. Turn your lantern right side up and you are finished.
Inside the lantern we place battery LED lights which flicker like real candles. It's so much fun. Enjoy.


Leave a reply to Ag Ambroult Cancel reply